Put your ssh experience in Windows on Steroids
Marco Franssen /
6 min read • 1161 words

In this blogpost I want to show you how you can make your life easier to work with Linux VM's and Git by configuring SSH on your Windows Machine in a secure but convenient way. Let me first elaborate a little further why you would want to apply the tips and tricks from this blog post.
Git has become the de-facto standard of vcs over the past few years. You are probably using it for all your software development projects, and maybe even for your web blog, when you are blogging in markdown using a static site generator.
You also might be using Nodejs, python or other programming languages which are easier to run on Linux. Probably you have been using a Virtualbox VM or you are deploying your solutions in the cloud. The last thing you want is entering your password each time you connect to the VM via PuTTY. Or when you are trying to send some file to the VM using for example WinSCP.
Furthermore I usually use vagrant for my VM's. Using the setup below will improve my experience.
This blogpost will help you putting the settings in place so you only have to enter your ssh-key's password only once. No matter what tool you are using following settings will apply to all of them when they use an ssh key to authenticate.
Prerequisites:
- Git (Git-extensions)
- PuTTY
- Puttygen (comes with Git-extensions)
Generate a SSH key
In order to generate an ssh key you can simply use ssh-keygen.exe which can be found in your Git installation directory in the bin folder. It is mandatory you name the keys exactly as in this blog post, since open_ssh will look for them using those names.
Open your Git Bash and execute following commands to generate your open-ssh key. Make sure you put a strong password on the key when prompted. This makes sure no one can use your key when you accidentally loose it somewhere.
$ ssh-keygen -t rsa -b 4096 -C "[email protected]"
Generating public/private rsa key pair.
Enter file in which to save the key (/c/Users/Marco/.ssh/id_rsa):
Enter passphrase (empty for no passphrase):
Enter same passphrase again:
Your identification has been saved in ~/.ssh/id_rsa.
Your public key has been saved in ~/.ssh/id_rsa.pub.
The key fingerprint is:
30:a5:c1:7a:bb:00:bf:7c:24:b7:4d:f1:d6:3d:e5:7e [email protected]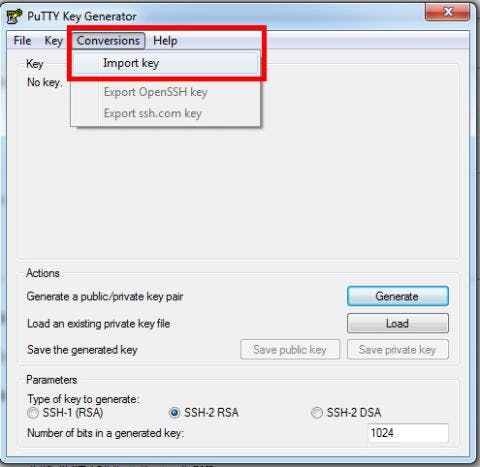
Now we have the ssh keys in place to be able to setup ssh connections either via Bash (id_rsa) or via PuTTY (id_rsa.ppk). The only problem is we have to enter the password each time in bash and we have to manually load the PuTTY key in pageant.exe.
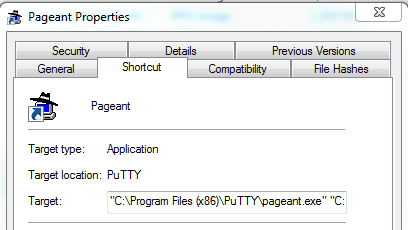
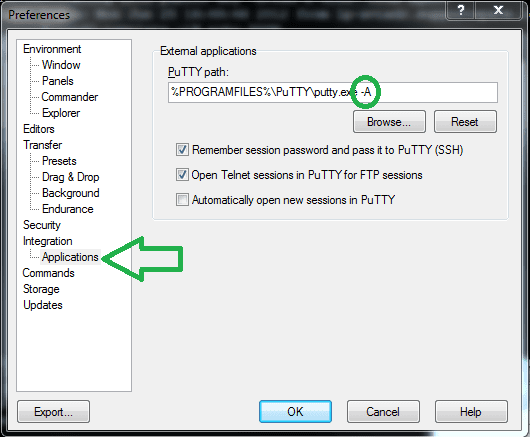
Pageant
The Pageant program that was installed as part of the PuTTY package, can store your keys and give them to mRemote, WinSCP and PuTTY as required. You can open pageant.exe and load your id_rsa.ppk key manually and provide the password. From now on PuTTY, WinSCP and any program that serves as a fronted for them (like mRemote) will first consult with the Pageant program if there is a key to use for the connection.
You might want to load this key automatically at startup. This can easily be done by using one of the following methods:
- Assuming you’ve allowed Pageant to take over the
ppksuffix, you should be able to simply add the key files to the Windows "startup" folder. -
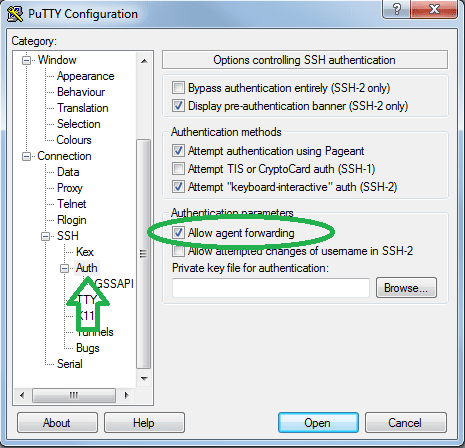
SSH Agent forwarding
This configuration is optional, but doing it will allow you once you’ve SSH ed into a machine to continue and SSH from it, to the next machine, with the same key. This way you don't have to put your SSH key on those servers.
Your private key should always stay as close as possible to you!
PuTTY
- Open PuTTY.
- Under "Connection” -> "SSH” -> "Auth”.
-
-

- Go back to "Session”
- Select the "Default Settings” entry.
- Click on "Save”.
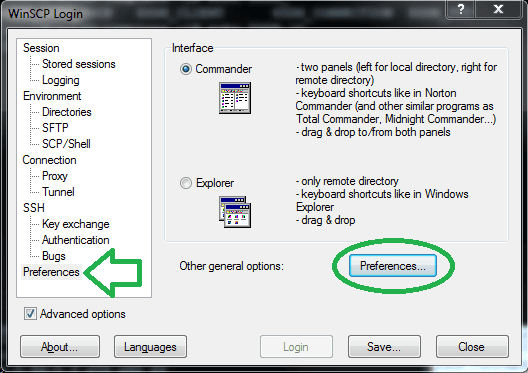
WinSCP
- In a WinSCP new connection tab, Enable the Advance options checkbox.
- Go to the "SSH” -> "Authentication”.
-
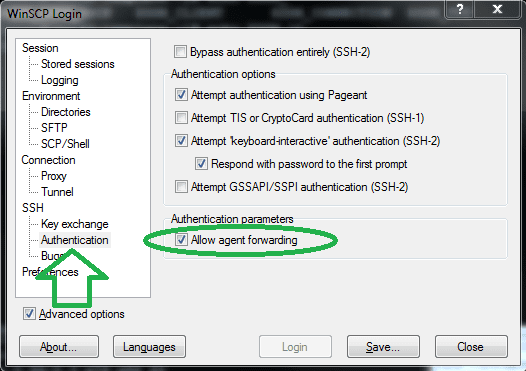
-
-
Now we can leverage the full power of SSH using PuTTY. However for bash we still have to provide the password for our key each time we open a new bash.
Bash profile
We can solve this by starting an ssh-agent to cache the key.
It can be easily configured by adding following .profile file to your %USERPROFILE% on the same level where you can find your .shh folder.
declare -x SSH_ENV="$HOME/.ssh/environment"

# start the ssh-agent
function start_agent {
    echo "Initializing new SSH agent..."
    # spawn ssh-agent
    ssh-agent | sed 's/^echo/#echo/' > "${SSH_ENV}"
    echo succeeded
    chmod 600 "${SSH_ENV}"
    . "${SSH_ENV}" > /dev/null
    ssh-add
}
# test for identities
function test_identities {
    # test whether standard identities have been added to the agent already
    ssh-add -l | grep "The agent has no identities" > /dev/null
    if [ $? -eq 0 ]; then
        ssh-add
        # $SSH_AUTH_SOCK broken so we start a new proper agent
        if [ $? -eq 2 ];then
            start_agent
        fi
    fi
}
# check for running ssh-agent with proper $SSH_AGENT_PID
if [ -n "$SSH_AGENT_PID" ]; then
    ps -f -u "${USERNAME}" | grep "$SSH_AGENT_PID" | grep ssh-agent > /dev/null
    if [ $? -eq 0 ]; then
        test_identities
    fi
else
    if [ -f "$SSH_ENV" ]; then
    . "$SSH_ENV" > /dev/null
    fi
    ps -f -u "${USERNAME}" | grep "$SSH_AGENT_PID" | grep ssh-agent > /dev/null
    if [ $? -eq 0 ]; then
        test_identities
    else
        start_agent
    fi
fi
Now your key will be cached once you have entered the password in bash one time. Each time you close bash and (re)open a new one your key will automatically be loaded.
Your folder structure will look something like this:
c:\Users\Marco\.profile
c:\Users\Marco\.ssh
c:\Users\Marco\.ssh\id_rsa
c:\Users\Marco\.ssh\id_rsa.ppk
c:\Users\Marco\.ssh\id_rsa.pub
Bonus
Put the contents of your id_rsa.pub key on a Linux server in the following folder: ~/.ssh/authorized_keys
From now on you will automatically login to the server without providing a password.
localhost -ssh -l marco -P 22
On connection your server will show something like following message:
Using username "marco".
Authenticating with public key "[email protected]" from agent
Last login: Sat Sep 12 14:48:21 2015 from 192.168.1.33
CoreOS stable (766.3.0)
marco@dockertest ~ $
I hope you will benefit from your SSH on steroids.
- No more entering passwords when pushing or pulling Git.
- No more putting your private ssh keys on a server or vm.
- No more logging in to a vm using a password.
- No more passwords when using WinSCP.
- Don't forget to lock your computer, since your key is cached now!