Loading...
Install a fresh Raspbian image on your Raspberry Pi — Part 1

Marco Franssen
6 min read•1093 words

In my last post, I showed how to upgrade from Raspbian Stretch to Raspbian Buster. The upgrade went smoothly, but at the time of writing I was still running into issues with Buster. The blocker for me was Kodi, which wouldn't start because of a GUI error. So I decided to install a fresh Raspbian Stretch image until the Buster packages caught up. Here's how I set up that installation on my Raspberry Pi.
Prerequisites
Before starting a fresh install, make sure you have an Ethernet cable handy. If you don't have a monitor and keyboard to connect to your Pi, we'll need Ethernet for SSH access until we've configured Wi-Fi. I only have my laptop available, so I'll do the setup over SSH.
We'll also need a microSD card to flash, the Etcher flashing tool, and a Raspbian image. Go ahead and download:
- Etcher flashing tool
- The Raspbian image of your choice (I chose the latest Raspbian Stretch image available at the time, as Buster was causing issues with Kodi)
Finally, you'll need some familiarity with SSH if, like me, you don't have a monitor and keyboard attached. If you do have them, you can skip the SSH steps below. A few years ago, I wrote about improving the SSH experience on Windows, and I'm still using that setup. If you need to set up SSH, follow that post.
Prepare your SD card
Now that we've downloaded the Raspbian image and Etcher, let's flash the card. Install Etcher, then launch it by pressing the Windows key and typing balenaEtcher. Extract the Raspbian image from the zip file. In Etcher, select the image and your SD card, then click Flash. A few minutes later, you'll have an almost ready-to-use card for your Raspberry Pi.
Note: Windows may prompt you to format the SD card. Ignore these prompts and click Cancel. The card's second partition uses a Linux filesystem that Windows doesn't support.
In File Explorer, you'll see the following files.
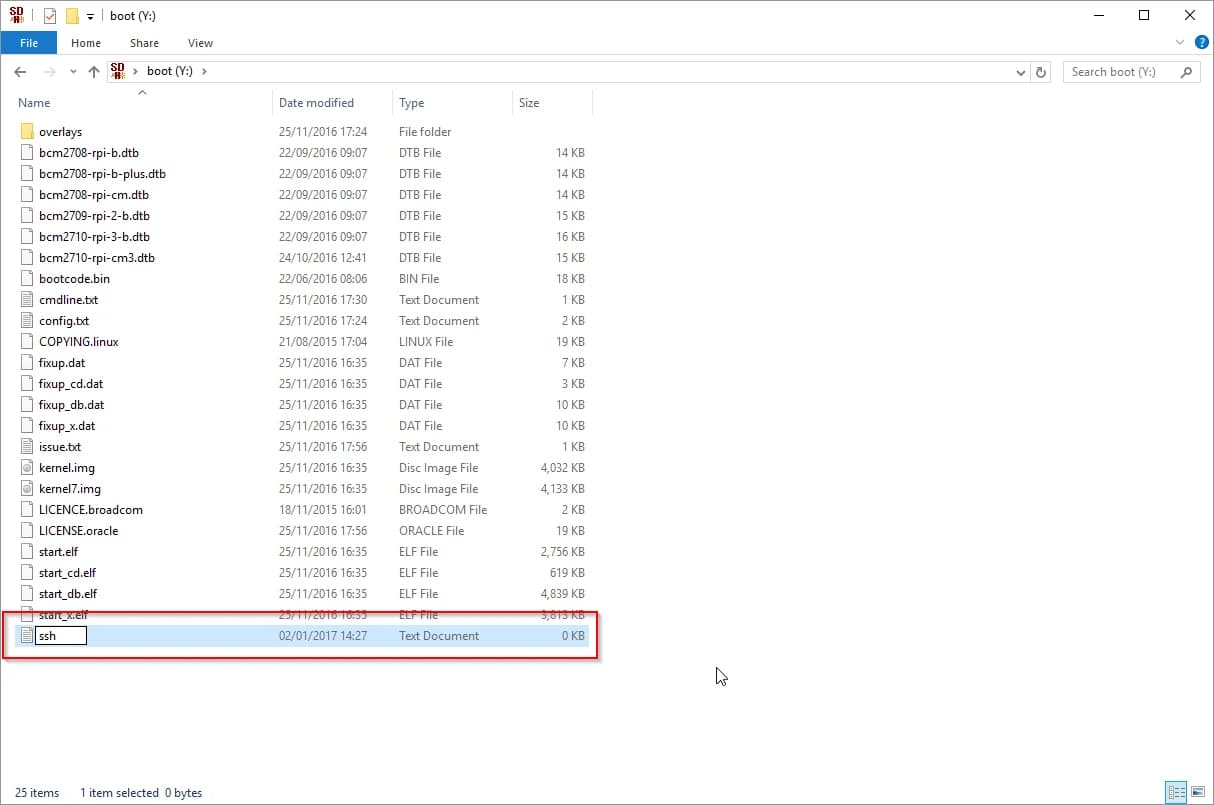
To enable SSH access, add an extensionless file named ssh to this folder, as shown above. To create it in Windows, name the file ssh. (note the trailing dot).
I also adjust the boot settings in config.txt before starting the Pi. Since I plan to run Kodi, I assign 256 MB of memory to the GPU—the minimum for my Kodi setup. You can skip this if you don't intend to install Kodi or another graphical application.
start_x=true
gpu_mem=256
Now insert the SD card into your Raspberry Pi, connect the Ethernet cable, and attach the power supply.
Access your Raspberry Pi via SSH
Open your router's admin panel to find the IP address assigned to your Raspberry Pi. You'll usually find it in the DHCP section. I'll use 192.168.1.15 in the following steps; replace it with the address your router assigned to your Pi.
First, I want to authorize my SSH key so I can log in without entering a password each time. If you don't have a key, you can skip this step and use password authentication, or create one by following the steps explained here.
ssh-copy-id pi@192.168.1.15Now I can log in to my Raspberry Pi using my SSH key with the following command.
ssh pi@192.168.1.15Upgrade packages
Once logged in, I start by upgrading the packages.
sudo apt update && sudo apt upgrade -yConfigure Wi-Fi and a static IP address
Next, I give my Raspberry Pi a static IP address so I won't have to look up a newly assigned address later. I'll configure the DHCP client to use a static address for the wireless adapter. You can use the following script or add the lines manually with vim or nano.
sudo tee -a /etc/dhcpcd.conf <<EOL
      interface wlan0
      static ip_address=192.168.1.3/24
      static routers=192.168.1.1
      static domain_name_servers=8.8.8.8 8.8.4.4
      EOL > /dev/null
Here, we assign the static IP address 192.168.1.3, set the router address, and use Google's DNS servers. You can use your ISP's DNS servers instead.
Next, let's configure Wi-Fi with the wpa_passphrase and wpa_cli command-line tools. We use wpa_passphrase to generate configuration for the network's SSID and password, then write it to the configuration file. Finally, we reconfigure wlan0 to use those settings.
wpa_passphrase "MyWirelessNetworkSSID" | sudo tee -a /etc/wpa_supplicant/wpa_supplicant.conf > /dev/null
wpa_cli -i wlan0 reconfigure
Once that's done, we can check that the wlan0 network adapter is up and running.
$ ifconfig
eth0: flags=4163<UP,BROADCAST,RUNNING,MULTICAST>  mtu 1500
        inet 192.168.1.15  netmask 255.255.255.0  broadcast 192.168.1.255
        inet6 fe80::4606:9aa4:78e5:11a2  prefixlen 64  scopeid 0x20<link>
        ether b8:27:eb:f3:b2:32  txqueuelen 1000  (Ethernet)
        RX packets 98760  bytes 142662769 (136.0 MiB)
        RX errors 0  dropped 1  overruns 0  frame 0
        TX packets 50845  bytes 4404739 (4.2 MiB)
        TX errors 0  dropped 0 overruns 0  carrier 0  collisions 0

lo: flags=73<UP,LOOPBACK,RUNNING>  mtu 65536
        inet 127.0.0.1  netmask 255.0.0.0
        inet6 ::1  prefixlen 128  scopeid 0x10<host>
        loop  txqueuelen 1000  (Local Loopback)
        RX packets 0  bytes 0 (0.0 B)
        RX errors 0  dropped 0  overruns 0  frame 0
        TX packets 0  bytes 0 (0.0 B)
        TX errors 0  dropped 0 overruns 0  carrier 0  collisions 0

wlan0: flags=4163<UP,BROADCAST,RUNNING,MULTICAST>  mtu 1500
        inet 192.168.1.3  netmask 255.255.255.0  broadcast 192.168.1.255
        inet6 fe80::b7d8:74db:5f86:2c07  prefixlen 64  scopeid 0x20<link>
        ether b8:27:eb:a6:e7:67  txqueuelen 1000  (Ethernet)
        RX packets 4  bytes 510 (510.0 B)
        RX errors 0  dropped 0  overruns 0  frame 0
        TX packets 19  bytes 2649 (2.5 KiB)
        TX errors 0  dropped 0 overruns 0  carrier 0  collisions 0
You no longer need the Ethernet cable. You can access the Pi at the static IP address configured for its wireless interface. Exit the current SSH session by typing exit, then try connecting to the shell using the new address.
ssh pi@192.178.1.3Reference
You should now be back in your Raspberry Pi's shell. With the installation ready, you can continue with your own setup. In the next part of this series, we'll improve the command-line experience, mount NFS shares, and install Kodi.