Loading...
Install Hashicorp Vault on Kubernetes using Helm - Part 1
Marco Franssen
12 min read•2301 words

Loading...
Marco Franssen
In this blogpost I want to show you how to deploy Hashicorp Vault using Helm on Kubernetes. We will look at deploying on your local machine for development and experimental purposes but also at how to deploy a high available setup on AWS using Hashicorp Consul and automated unsealing using a AWS KMS key. I assume most of you will know about Hashicorp Vault, Helm, Kubernetes and Consul and therefore I will not go very much in details on the tools themself.
In this first article of the series we will look at a deployment on our local environment. Let's have a look at the tools that come across in this first article to set a bit of context.
Secure, store and tightly control access to tokens, passwords, certificates, encryption keys for protecting secrets and other sensitive data using a UI, CLI, or HTTP API.
Helm helps you manage Kubernetes applications — Helm Charts help you define, install, and upgrade even the most complex Kubernetes application. Charts are easy to create, version, share, and publish — so start using Helm and stop the copy-and-paste.
Kubernetes, also known as K8s, is an open-source system for automating deployment, scaling, and management of containerized applications.
It groups containers that make up an application into logical units for easy management and discovery. Kubernetes builds upon 15 years of experience of running production workloads at Google, combined with best-of-breed ideas and practices from the community.
To be able to follow this blogpost locally on your development machine it is recommended to have following tools installed.
A quick way to install these tools on your Mac is to use Homebrew.
brew install --cask docker # docker as well installs kubectl
brew install helm
On Windows you could go for Chocolatey to get the tools installed on your environment.
choco install docker-desktop kubernetes-helmIn case you still want to know a bit more on the before mentioned tools see the references at the end of this article.
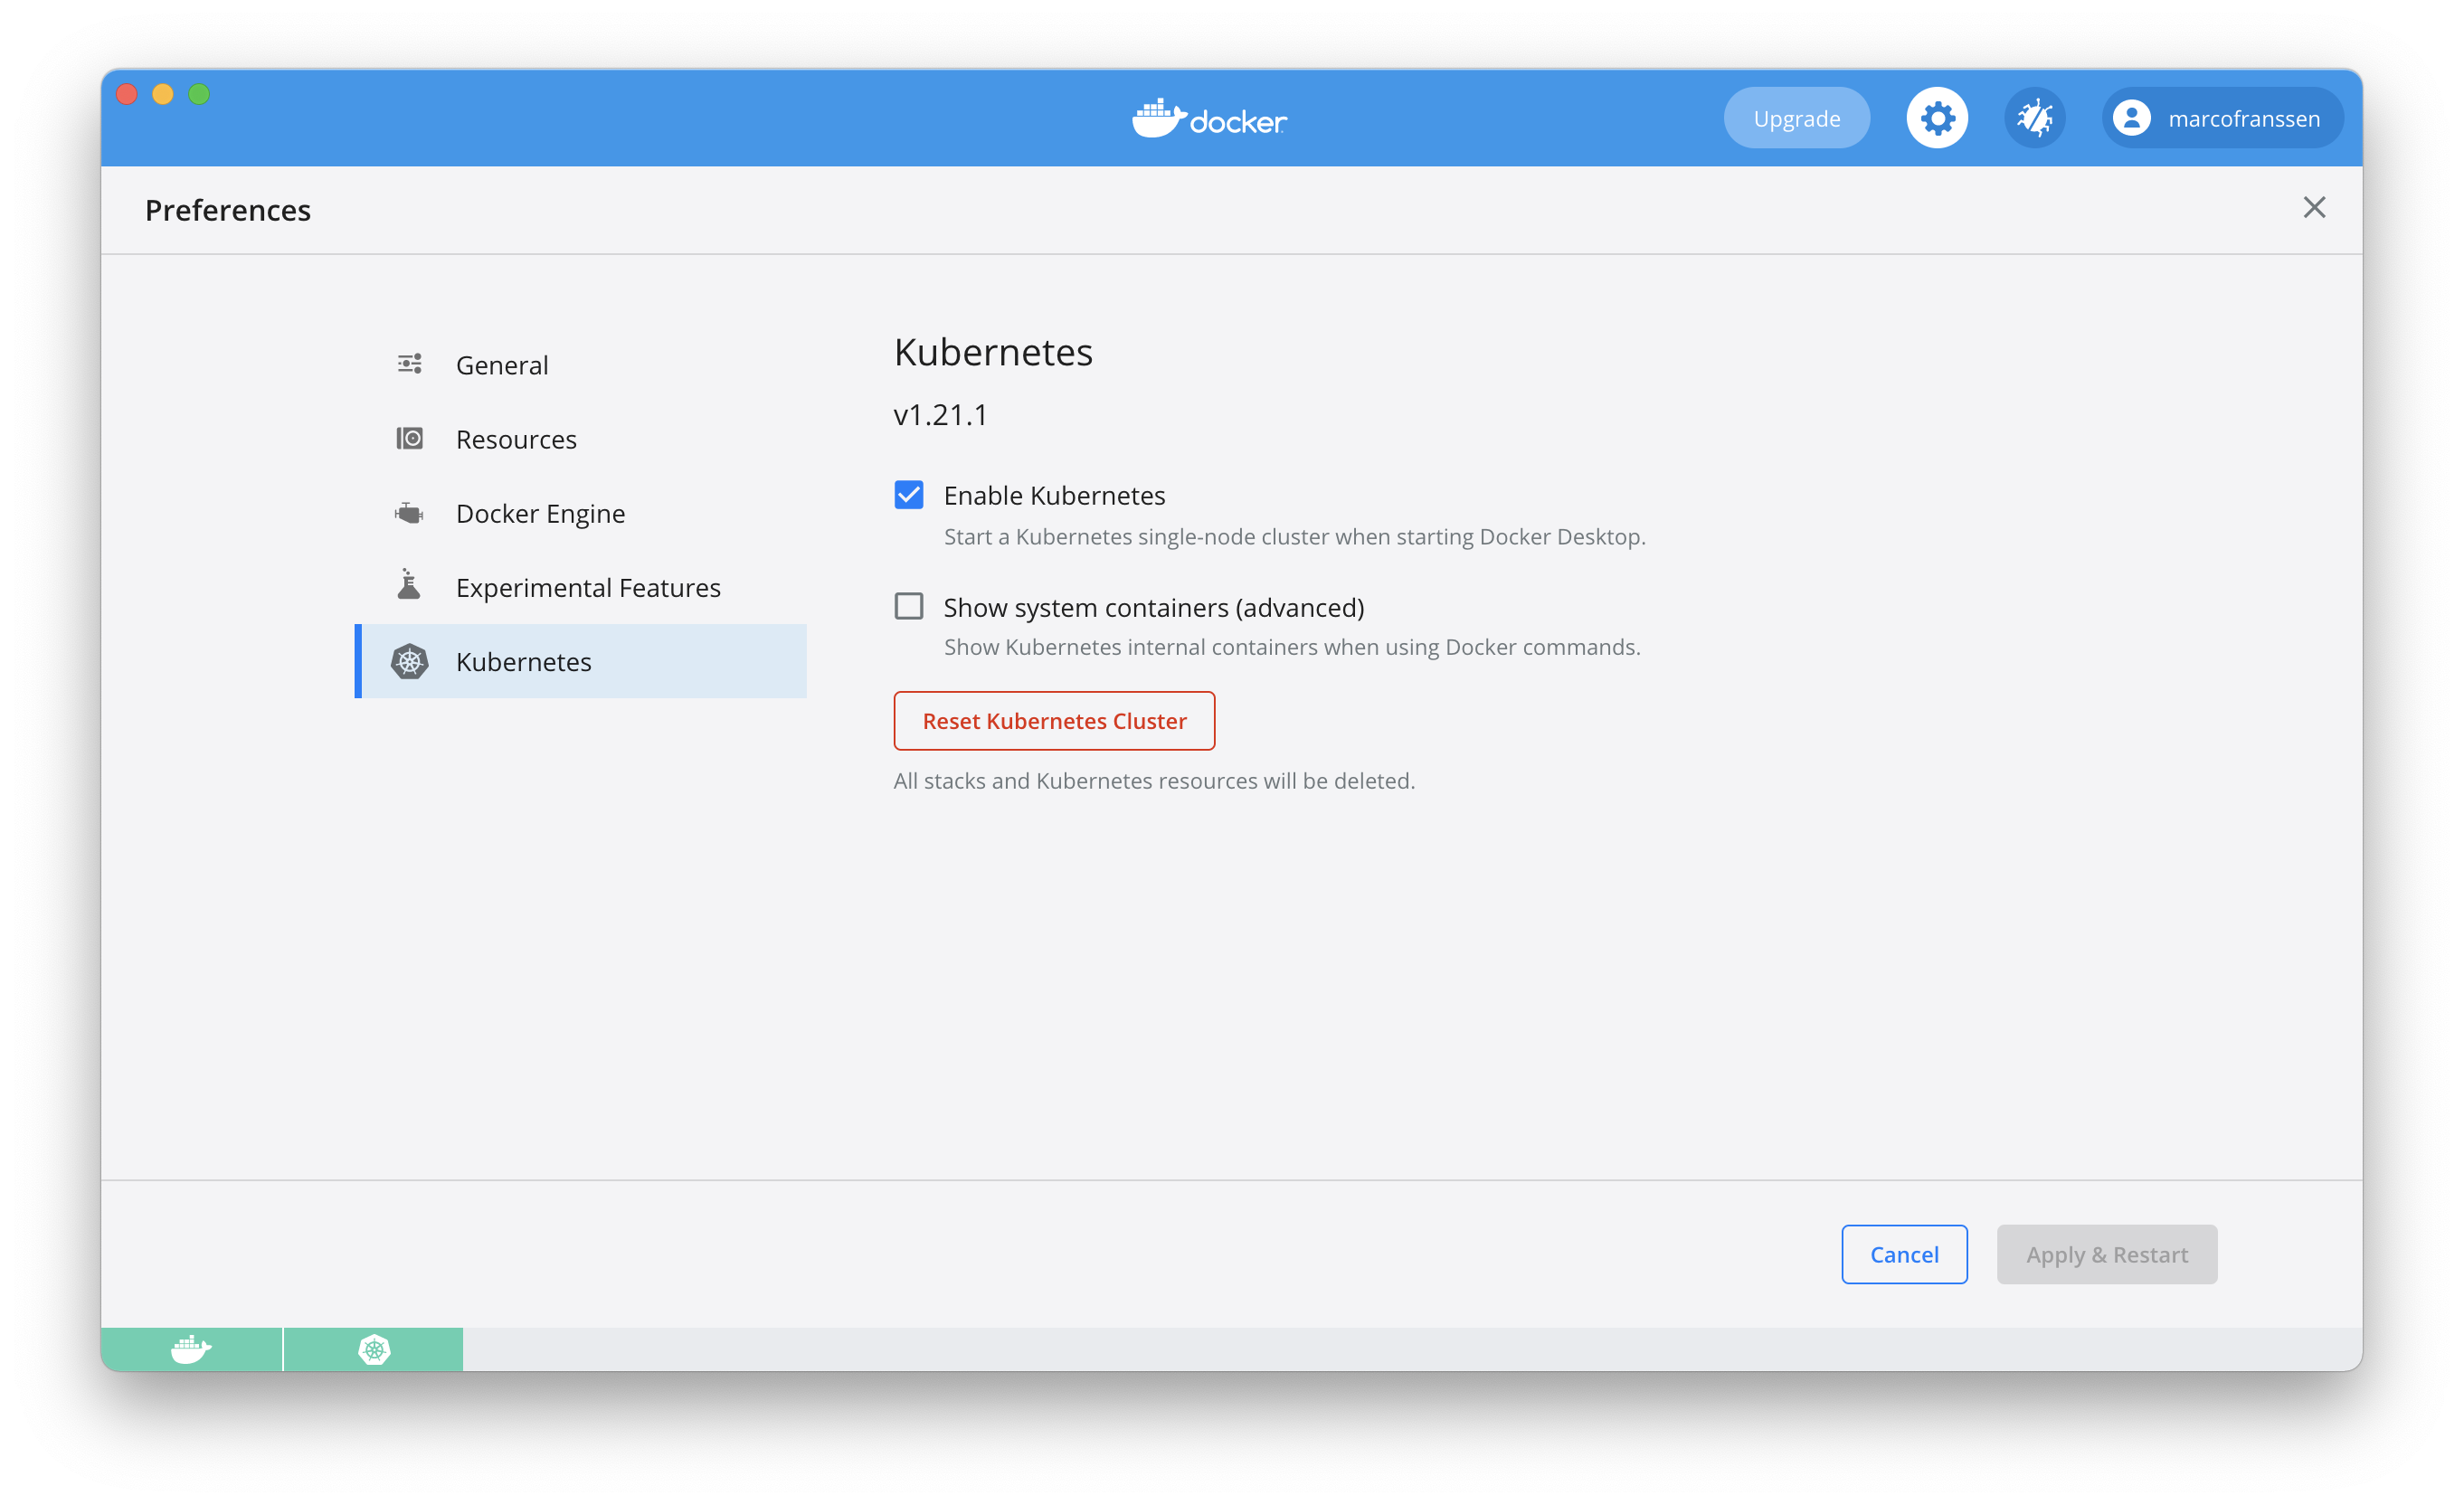
Now we have our tooling in place we can start by enabling Kubernetes from our Docker Desktop environment.
Now with all of this in place we can start with deploying some workloads to Kubernetes. To do so I want to reuse some existing Helm charts from Hashicorp to automate the majority of our deployment. For that we will have to add the helm repository.
$ helm repo add hashicorp https://helm.releases.hashicorp.com
https://helm.releases.hashicorp.com
$ helm repo list
NAME                    URL
hashicorp               https://helm.releases.hashicorp.com
…
Now we have the helm repo added we can search it for charts.
$ helm search repo vault

NAME            CHART VERSION   APP VERSION     DESCRIPTION
hashicorp/vault 0.13.0          1.7.3           Official HashiCorp Vault Chart
This shows us there is a 0.13.0 version of the chart available that uses version 1.7.3 of Hashicorp Vault. Let us try to install it on our Kubernetes cluster. First lets see if we are connected to the correct Kubernetes cluster by requesting for some cluster-info.
$ kubectl cluster-info
Kubernetes control plane is running at https://kubernetes.docker.internal:6443
KubeDNS is running at https://kubernetes.docker.internal:6443/api/v1/namespaces/kube-system/services/kube-dns:dns/proxy
As you can see we are connected to our local k8s cluster. Now let us install the Helm chart on our local cluster in a namespace called my-vault.
$ helm -n my-vault install --create-namespace -g hashicorp/vault
NAME: vault-1625395823
LAST DEPLOYED: Sun Jul  4 12:50:25 2021
NAMESPACE: my-vault
STATUS: deployed
REVISION: 1
NOTES:
Thank you for installing HashiCorp Vault!

Now that you have deployed Vault, you should look over the docs on using
Vault with Kubernetes available here:

https://www.vaultproject.io/docs/


Your release is named vault-1625395823. To learn more about the release, try:

  $ helm status vault-1625395823
  $ helm get manifest vault-1625395823
The -g parameter generates a random name for the release. Now go ahead and try the commands shown in the output to get some more details on your Helm release. If it doesn't work, add the namespace to the command (see the install command). Using the manifest command you see all the kubernetes resources created by this Helm release. Now lets have a look at the pods.
$ kubectl -n my-vault get pods
NAME                                               READY   STATUS    RESTARTS   AGE
vault-1625395823-0                                 0/1     Running   0          3m42s
vault-1625395823-agent-injector-5d94d68689-fs58c   1/1     Running   0          3m42s
As you can see one of the pods isn't ready. Let's figure out the reason by looking at the pod logs.
$ kubectl -n my-vault logs vault-1625395823-0
==> Vault server configuration:

             Api Address: http://10.1.0.118:8200
                     Cgo: disabled
         Cluster Address: https://vault-1625395823-0.vault-1625395823-internal:8201
              Go Version: go1.15.13
              Listener 1: tcp (addr: "[::]:8200", cluster address: "[::]:8201", max_request_duration: "1m30s", max_request_size: "33554432", tls: "disabled")
               Log Level: info
                   Mlock: supported: true, enabled: false
           Recovery Mode: false
                 Storage: file
                 Version: Vault v1.7.3
             Version Sha: 5d517c864c8f10385bf65627891bc7ef55f5e827

2021-07-04T10:50:43.289Z [INFO]  proxy environment: http_proxy="" https_proxy="" no_proxy=""
==> Vault server started! Log data will stream in below:

2021-07-04T10:50:50.440Z [INFO]  core: security barrier not initialized
2021-07-04T10:50:50.440Z [INFO]  core: seal configuration missing, not initialized
2021-07-04T10:50:55.521Z [INFO]  core: security barrier not initialized
2021-07-04T10:50:55.521Z [INFO]  core: seal configuration missing, not initialized
2021-07-04T10:51:00.424Z [INFO]  core: security barrier not initialized
…As you can see Vault has not been initialized yet. For folks who worked earlier with Hashicorp Vault you know you will first have to initialize Hashicorp Vault. We can do so by either configuring the VAULT_ADDR environment variable to use our local Vault cli or we can exec inside the container. To be able to reach from outside of the Kubernetes cluster we have to do a little more to expose the Vault API, so let's first try to reach from within the container.
$ kubectl --namespace my-vault exec -it vault-1625395823-0 -- vault status

Key                Value
---                -----
Seal Type          shamir
Initialized        false
Sealed             true
Total Shares       0
Threshold          0
Unseal Progress    0/0
Unseal Nonce       n/a
Version            1.7.3
Storage Type       file
HA Enabled         false
command terminated with exit code 2
$ kubectl --namespace my-vault exec -it vault-1625395823-0 -- vault operator init
Unseal Key 1: upSmKPHsRR8ihCvjZ4VKJwRcaK9EiqOKPNjXGyjuv4NI
Unseal Key 2: WyQTh2JCDA3UsZ4QIgFI/K8qxpA8Dels9PoG12uf6Usq
Unseal Key 3: x1a05Yn5xWANyRb6aryTb2HM4XUKwOVX2jhkzQk+XELj
Unseal Key 4: JHwLBRfsBfYwN9Ts69JR+HJ9NHMRqu9RDx2cgPenwaeH
Unseal Key 5: 5cVmkn+nAhlhKDeQ/IM/6AUvsBWXhF4F60Gmuy0RuzZU

Initial Root Token: s.mGbFL0B7VpmA8eaYaOWNiOES

Vault initialized with 5 key shares and a key threshold of 3. Please securely
distribute the key shares printed above. When the Vault is re-sealed,
restarted, or stopped, you must supply at least 3 of these keys to unseal it
before it can start servicing requests.

Vault does not store the generated master key. Without at least 3 key to
reconstruct the master key, Vault will remain permanently sealed!

It is possible to generate new unseal keys, provided you have a quorum of
existing unseal keys shares. See "vault operator rekey" for more information.
As you can see by requesting the vault status we figured indeed our vault was not initialized and sealed. Then I generated my unseal keys, ensure to keep them secure at all times. Never ever share them like I did here in my blog.
⚠️ Write down your secrets for use later in this article.
The vault operator init command also supports more parameters that allow you to finetune the keyshares or distribute those keyshares amongs keybase users. This last option is very powerfull and ensure nobody owns all the keys for "nuclear control", but instead requires a couple of your teammmembers to unlock the store.
Checking again on the status of our Pods we now see the Vault pos is in a ready state as well.
$ kubectl -n my-vault get pods
NAME                                               READY   STATUS    RESTARTS   AGE
vault-1625395823-0                                 1/1     Running   0          9m37s
vault-1625395823-agent-injector-5d94d68689-fs58c 1/1 Running 0 9m37sIf you have a vault cli installed locally you can also call Vault from local by configuring the API endpoint. To install Vault run brew install vault (MacOS) or choco install vault (Windows). To figure out the API endpoint, we need to query the services from our Kubernetes deployment.
If you don't want to install the cli locally you can also open a shell in the container (kubectl --namespace my-vault exec -it vault-1625395823-0 -- sh). In the next bits, you should then skip setting the VAULT_ADDR environment variable and run the shell commands without. Please do continue to be able to access the Vault UI in your browser, later in this article.
$ kubectl -n my-vault get services
NAME                                  TYPE        CLUSTER-IP      EXTERNAL-IP   PORT(S)             AGE
vault-1625395823                      ClusterIP   10.104.86.249   <none>        8200/TCP,8201/TCP   20h
vault-1625395823-agent-injector-svc   ClusterIP   10.109.66.228   <none>        443/TCP             20h
vault-1625395823-internal             ClusterIP   None            <none>        8200/TCP,8201/TCP   20h
As you can see we don't have an external IP yet. Let's see to update our Helm Chart deployment to expose the API out of our Kubernetes cluster. By looking at the Vault Helm Chart we can see the configuration options that allow us to customize the default deployment. Let's enable the ingress so we can access Hashicorp Vault from outside of our Kubernetes cluster.
$ echo "server:
  ingress:
    enabled: true

    hosts:
      - host: localhost
        paths: []
" > customize-vault.yaml
$ helm -n my-vault upgrade vault-1625395823 hashicorp/vault -f customize-vault.yaml
W0705 10:06:57.709957   10328 warnings.go:70] networking.k8s.io/v1beta1 Ingress is deprecated in v1.19+, unavailable in v1.22+; use networking.k8s.io/v1 Ingress
W0705 10:06:57.880034   10328 warnings.go:70] networking.k8s.io/v1beta1 Ingress is deprecated in v1.19+, unavailable in v1.22+; use networking.k8s.io/v1 Ingress
W0705 10:06:57.884498   10328 warnings.go:70] networking.k8s.io/v1beta1 Ingress is deprecated in v1.19+, unavailable in v1.22+; use networking.k8s.io/v1 Ingress
Release "vault-1625395823" has been upgraded. Happy Helming!
NAME: vault-1625395823
LAST DEPLOYED: Mon Jul  5 10:06:57 2021
NAMESPACE: my-vault
STATUS: deployed
REVISION: 2
NOTES:
Thank you for installing HashiCorp Vault!

Now that you have deployed Vault, you should look over the docs on using
Vault with Kubernetes available here:

https://www.vaultproject.io/docs/


Your release is named vault-1625395823. To learn more about the release, try:

  $ helm status vault-1625395823
  $ helm get manifest vault-1625395823
$ VAULT_ADDR=http://localhost/ vault status
Key                Value
---                -----
Seal Type          shamir
Initialized        true
Sealed             true
Total Shares       5
Threshold          3
Unseal Progress    0/3
Unseal Nonce       n/a
Version            1.7.3
Storage Type       file
HA Enabled         false
As you can see we can now access our Vault externally via the configured ingress and we can see the Vault is now also initialized. Now lets unseal the vault so we can start using it. You will have to provide 3 out of 5 unseal keys based on your unseal configuration.
$ VAULT_ADDR=http://localhost/ vault operator unseal
Unseal Key (will be hidden):
Key                Value
---                -----
Seal Type          shamir
Initialized        true
Sealed             true
Total Shares       5
Threshold          3
Unseal Progress    1/3
Unseal Nonce       0ff568f3-1327-6c99-581a-206271068364
Version            1.7.3
Storage Type       file
HA Enabled         false
$ VAULT_ADDR=http://localhost/ vault operator unseal
Unseal Key (will be hidden):
Key                Value
---                -----
Seal Type          shamir
Initialized        true
Sealed             true
Total Shares       5
Threshold          3
Unseal Progress    2/3
Unseal Nonce       0ff568f3-1327-6c99-581a-206271068364
Version            1.7.3
Storage Type       file
HA Enabled         false
$ VAULT_ADDR=http://localhost/ vault operator unseal
Unseal Key (will be hidden):
Key             Value
---             -----
Seal Type       shamir
Initialized     true
Sealed          false
Total Shares    5
Threshold       3
Version         1.7.3
Storage Type    file
Cluster Name    vault-cluster-a4e795d8
Cluster ID      361c5ea0-2ee4-43ed-132a-cd180de0aca9
HA Enabled      false
Now we have the Vault unsealed we can start using it. Either via the cli or via the Vault UI. Go ahead and try to access Vault from your browser.
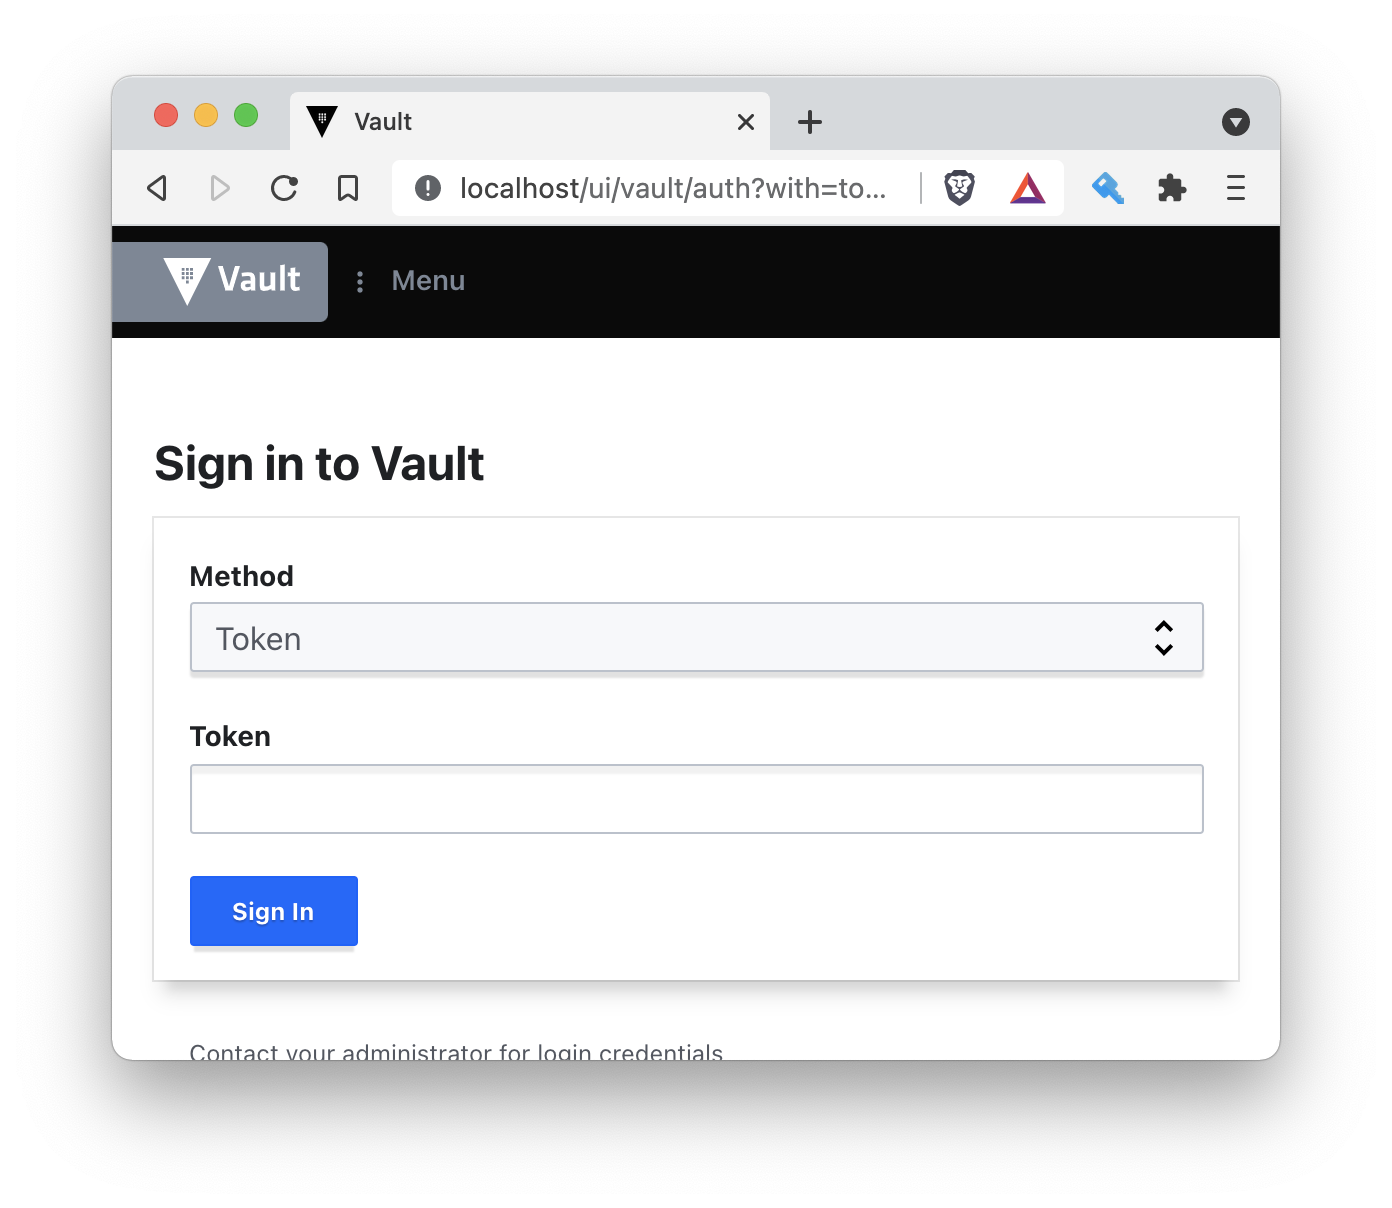
Sign in using the RootToken (exposed earlier when we did the init) and play arround by configuring some secret store. You can also sign in on the commandline and play arround with Vault on the CLI. See below a workflow that logs in the CLI and then stores a value in the cubbyhole store.
$ VAULT_ADDR=http://localhost/ vault login
Token (will be hidden):
Success! You are now authenticated. The token information displayed below
is already stored in the token helper. You do NOT need to run "vault login"
again. Future Vault requests will automatically use this token.

Key                  Value
---                  -----
token                s.yqqejg7VCk7J5sOsPly0WSN7
token_accessor       c72GA4zI7Jh4JHKY9BXvf8AZ
token_duration       ∞
token_renewable      false
token_policies       ["root"]
identity_policies    []
policies             ["root"]
$ VAULT_ADDR=http://localhost/ vault write cubbyhole/awesome stuff=cool
Success! Data written to: cubbyhole/awesome
$ VAULT_ADDR=http://localhost/ vault list cubbyhole
Keys
----
awesome
$ VAULT_ADDR=http://localhost/ vault read cubbyhole/awesome
Key      Value
---      -----
stuff    cool
Also check out your new secret from the UI. In the next article I will show you how to configure Vault in high availability mode using Consul on a EKS cluster in AWS. As well how to use AWS KMS to automatically unseal your Vault.
While waiting for my next blog you may want to play arround a bit more with your current setup. You can also choose to use the development mode in your chart. This creates you a deployment that has an unsealed vault by default with a root token as defined in the values.yaml. This is very convenient if you just want to play with Vault, but not recommended to put in place in any non-development environment.
Thanks for reading this blog and see you in part 2 of this article.
Marco Franssen
In my last blog series I have shown an example of deploying Hashicorp Vault on Kubernetes using Helm Charts (see references). This time I want to show you how to more easily integrate this into your … wait for it … 😄, DevSecGitOps flow. Especially Helm charts help a lot in connecting the software part with our infrastructure / deployment (DevOps). Besides that we can embed all kind of security practices in our Helm charts like for example RBAC, Network policies etc. In this blog I want to show…
Marco Franssen
In part 1 we had a look at setting up our prerequisuites and running Hashicorp Vault on our local Kubernetes cluster. This time we will have a look at deploying Hashicorp Vault on a EKS cluster at AWS. This time we will deploy a Vault cluster in High Availability mode using Hashicorp Consul and we will use AWS KMS to auto unseal our Vault. First lets have a look at the new tools we are about to introduce. If you didn't read part 1, you might consider reading that first to get a bit more underds…

Marco Franssen
As a DevOps engineer you are probably familiar with SSH keys and how to use them already. I wrote some blogs on SSH in the past as well see the references. This time I want to zoom in a bit on the encryption strength of your keys and the encryption types you can use. Why should you care about this? In todays world password are becoming more and more a security risk. In the near future Github for example will not support password authentication anymore for clone, push and pull actions, just lik…

Marco Franssen
It has been a while since I wrote a blog on Go. Since I'm getting the question if Go supports enums every now and then, I thought it would be good to write an article on how to do enums in Go. Go natively does NOT have an enum type like you might be used to from c# or Java. However that doesn't mean we can easily define our own type. In this blog we will cover defining our own type, combined with a piece of code generation. If you are new to Go, then consider reading Start on your first Go pro…