Loading...
Signing Docker images using Docker Content Trust

Marco Franssen
8 min read•1500 words

In this post, I want to introduce you to signing Docker images with Docker Content Trust. Signing adds a layer of trust: consumers can verify that an image was published by you and hasn't been tampered with.
You might already have used PGP to sign your Git commits. In this blog post, I showed a nice way to set up PGP signing keys using Krypton with 2FA. Docker image signing uses the same basic concept.
If this all sounds a bit fuzzy, keep reading. Hopefully, I can make it clearer. ;-)
Docker Content Trust (DCT) provides the ability to use digital signatures for data sent to and received from remote Docker registries. These signatures allow client-side or runtime verification of the integrity and publisher of specific image tags.
Through DCT, image publishers can sign their images and image consumers can ensure that the images they use are signed. Publishers could be individuals or organizations manually signing their content or automated software supply chains signing content as part of their release process.
For consumers, nothing changes until DCT is enabled. From then on, they can only work with signed images. As developers, we need to sign our images so they can also be used in more restricted environments with DCT enabled.
DCT builds on Notary, a more general-purpose solution for signing artifacts. DCT applies this functionality to Docker images.
To sign your images, we'll create X.509 certificates. These are used both to sign repositories and to define who is allowed to sign them. You can also import existing certificates, such as those managed by a PKI solution or created with the openssl command line.
Setting up your certificates
Before we start, it's very important to back up your certificates and store their credentials in a password manager. Take particular care with the root certificate we're about to generate.
WARNING: Loss of the root key is very difficult to recover from. Correcting this loss requires intervention from Docker Support to reset the repository state. This loss also requires manual intervention from every consumer that used a signed tag from this repository prior to the loss.
The keys are stored in ~/.docker/trust/private (macOS/Linux) or %USERPROFILE%\.docker\trust\private (Windows). Consult the Docker Content Trust documentation for guidance on backing up your signing keys.
There are several types of keys, arranged in a hierarchy as shown below.
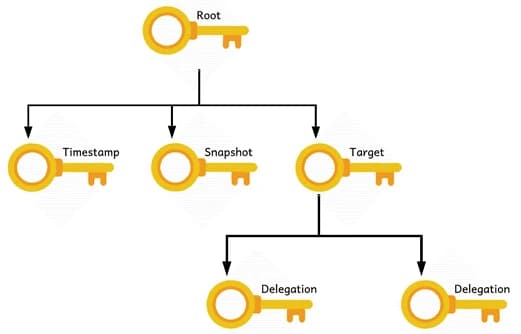
| Key | Description |
|---|---|
| root key | Root of content trust for an image tag. When content trust is enabled, you create the root key once. Also known as the offline key, because it should be kept offline. |
| targets | This key allows you to sign image tags and manage delegations, including delegated keys and permitted delegation paths. Also known as the repository key, since it determines which tags can be signed in an image repository. |
| snapshot | This key signs the current collection of image tags, preventing mix-and-match attacks. |
| timestamp | This key provides freshness guarantees for Docker image repositories without requiring periodic content refreshes on the client side. |
| delegation | Delegation keys are optional tagging keys that let you delegate image tag signing to other publishers without sharing your targets key. |
Let's have a look at the docker trust CLI.
$ docker trust --help
Usage:	docker trust COMMAND

Manage trust on Docker images

Management Commands:
  key         Manage keys for signing Docker images
  signer      Manage entities who can sign Docker images

Commands:
  inspect     Return low-level information about keys and signatures
  revoke      Remove trust for an image
  sign        Sign an image

Run 'docker trust COMMAND --help' for more information on a command.
As you can see, docker trust lets us manage keys and authorized signers, inspect signatures, and sign images or revoke trust.
Let's create our signing key first. The --dir option below specifies where to store the public key.
$ docker trust key generate marco --dir ~/.docker/trust
docker trust key generate marco
Generating key for marco...
Enter passphrase for new marco key with ID 8ede853:
Repeat passphrase for new marco key with ID 8ede853:
Successfully generated and loaded private key. Corresponding public key
available: /Users/marco/.docker/trust/marco.pub
Once we've created our key, we can use notary to get an overview of our keys. Oh, and don't forget to store the credentials and arrange some backups.
$ notary -d ~/.docker/trust key list
ROLE     GUN    KEY ID                                                              LOCATION
----     ---    ------                                                              --------
marco           8ede853f5c5f6b119202e86478d0dff4fc7e37f803fefcf2da7138d8dcce1401    /Users/marco/.docker/trust/private
Manage entities for a repository
Now that we have a personal signing key, we can authorize it to sign Docker images for a given repository. This also creates new targets keys if the signed repository hasn't been initialized yet. The root key is required to create new repository keys, and the repository key is required to add or remove signers.
$ docker trust signer add --key ~/.docker/trust/marco.pub marco marcofranssen/whalesay
Adding signer "marco" to marcofranssen/whalesay...
Initializing signed repository for marcofranssen/whalesay...
Enter passphrase for root key with ID 2c799e5:
Enter passphrase for new repository key with ID b635efe:
Repeat passphrase for new repository key with ID b635efe:
Successfully initialized "marcofranssen/whalesay"
Successfully added signer: marco to marcofranssen/whalesay
Running the notary command again shows the additional keys.
$ notary -d ~/.docker/trust key list
ROLE     GUN                           KEY ID                                                              LOCATION
----     ---                           ------                                                              --------
marco                                  8ede853f5c5f6b119202e86478d0dff4fc7e37f803fefcf2da7138d8dcce1401    /Users/marco/.docker/trust/private
targets  .../marcofranssen/whalesay    b635efe210fb79e2425e3b7fa102324e5bb759151bdb089bdd79e820b75b160b    /Users/marco/.docker/trust/private
Signing
Now we have all the keys in place to sign a Docker image called marcofranssen/whalesay. First, I need to create the image or download an existing one and tag it with that name.
docker pull docker/whalesay
docker tag docker/whalesay marcofranssen/whalesay:latest
$ docker trust sign marcofranssen/whalesay:latest
Signing and pushing trust data for local image marcofranssen/whalesay:latest, may overwrite remote trust data
The push refers to repository [docker.io/marcofranssen/whalesay]
5f70bf18a086: Layer already exists
d061ee1340ec: Layer already exists
d511ed9e12e1: Layer already exists
091abc5148e4: Layer already exists
b26122d57afa: Layer already exists
37ee47034d9b: Layer already exists
528c8710fd95: Layer already exists
1154ba695078: Layer already exists
latest: digest: sha256:4a79736c5f63638261bc21228b48e9991340ca6d977b73de3598be20606e5d87 size: 2402
Signing and pushing trust metadata
Enter passphrase for marco key with ID eb9dd99:
Successfully signed docker.io/marcofranssen/whalesay:latest
Now we can inspect the signing details of our image.
$ docker trust inspect --pretty marcofranssen/whalesay
Signatures for marcofranssen/whalesay

SIGNED TAG          DIGEST                                                             SIGNERS
latest              4a79736c5f63638261bc21228b48e9991340ca6d977b73de3598be20606e5d87   marco

List of signers and their keys for marcofranssen/whalesay

SIGNER              KEYS
marco               eb9dd99255f9

Administrative keys for marcofranssen/whalesay

  Repository Key:       b635efeddff59751e8b6b59abb45383555103d702e7d3f46fbaaa9a8ac144ab8
  Root Key:     0428c356406a6ea3543012855c117d13d784774e49aa6db461cfbad5726d187b
To revoke trust for a signed image tag, use the following command.
$ docker trust revoke marcofranssen/whalesay:latest
Enter passphrase for marco key with ID eb9dd99:
Successfully deleted signature for marcofranssen/whalesay:latest
$ docker trust inspect --pretty marcofranssen/whalesay
No signatures for marcofranssen/whalesay

List of signers and their keys for marcofranssen/whalesay

SIGNER              KEYS
marco               eb9dd99255f9

Administrative keys for marcofranssen/whalesay

  Repository Key:       b635efeddff59751e8b6b59abb45383555103d702e7d3f46fbaaa9a8ac144ab8
  Root Key:     0428c356406a6ea3543012855c117d13d784774e49aa6db461cfbad5726d187b
Last but not least, you can add your colleagues as signers for your repositories using their public keys. They'll need to generate a key first and share the public key with you so you can authorize it.
You might want to bookmark the TL;DR below so you can easily look up these commands later.
TL;DR
Generate / Load Keys
Create a new signing key or load an existing signing key.
NOTE: the name you provide will also be the name used in the signer data. Consider using a descriptive name.
docker trust key generate marco --dir ~/.docker/trustdocker trust key load key.pem --name marcoAdding delegation key
Add another team member to allow them to sign images for a given repository.
docker trust signer add --key buddy.pub buddy <image>:<tag>Removing a signer
Remove a team member's permission to sign images for a given repository.
docker trust signer remove buddy <image>:<tag>Signing an image
Sign a specific tag of the image.
docker trust sign <image>:<tag>Revoke trust
Remove the signature from a specific image tag.
docker trust revoke <image>:<tag>Inspect image trust
Inspect the signing data of an image.
docker trust inspect --pretty <image>:<tag>Enabling content trust
Content trust is disabled by default. To work only with signed images, enable Docker Content Trust.
NOTE: This prevents you from using unsigned images. Docker pull will fail if the image isn't signed. You won't be able to build your own image using an unsigned image in the FROM definition.
export DOCKER_CONTENT_TRUST=1set DOCKER_CONTENT_TRUST=1References
Thanks for reading my blog.